Outdoor Home Maintenance: Rain Barrel Disguise DIY Project
Posted by Cathleen V. on 8th Jun 2023
Tuesday, May 22, 2018
If there's one thing always changing on our farm, it's the weather. Unless you want it to change, in which case it won't. We started actively using rain barrels during a couple of very dry summers to help take the stress off the well. Attached to the gutters at the edge of your home's roof, rain barrels store excess rainwater that would otherwise flow away and be lost for use when the weather is dry again. But the one thing that always drove me crazy when I would drive up to the house was the plain, plastic, BRIGHT BLUE barrel that was sitting at the side of the house--it was ugly!
Today's DIY home improvement project is an easy way to dress up that ugly rain barrel to create a beautiful new feature for your home and garden.
Spend a Few DIY Hours Disguising a Rain Barrel

Tools and Materials
- The 55-gallon plastic barrel had come from a local farm store, but you can also find them on Craigslist or other local advertising sites for a few bucks. Make sure the barrel is food grade and hasn't been used to store chemicals.
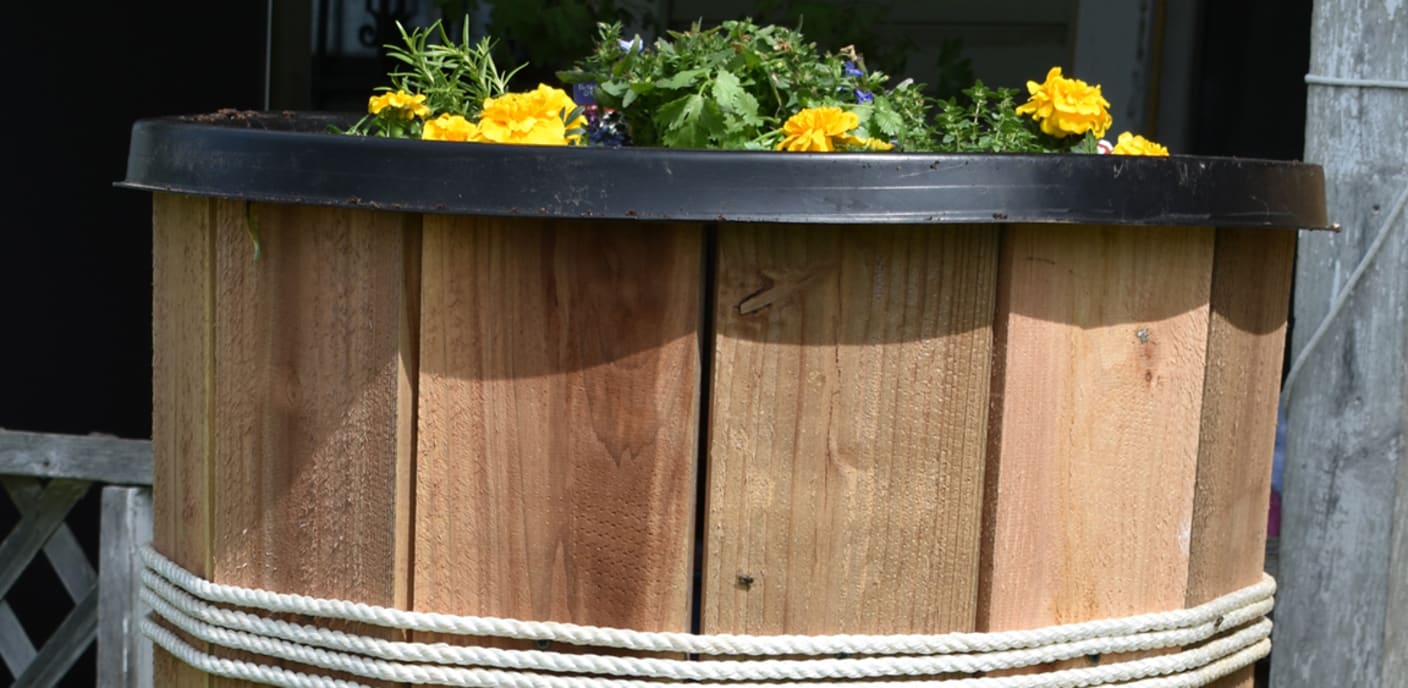
- 13 cedar fence boards were used to disguise the barrel because of their natural rot resistance, though you could really use just about any relatively thin, solid-wood board available. You could also use 6"x48" vinyl plank flooring, as it's designed to be water resistant for use in bathrooms or, if you use a shorter barrel, 6"x36" ceramic plank tiles would work well.
- To wrap the boards around the barrel, you can use 50' of rope, 15' lightweight metal banding or 15' of copper pipe pounded flat. If you decide to use rope, a nylon rope as pictured will hold up much better than sisal or jute.
- 1-5/8" outdoor deck screws held the top of the boards in place.
- A hose bib, galvanized steel nipple, galvanized steel coupler and Teflon tape. Most hoses use 3/4" threaded pipe connections.
- A small amount of waterproof silicone caulk was used between the inside of the barrel and the coupler to prevent leaks.
- To elevate the barrel and allow as much water as possible to be used at a time, we added a few landscaping blocks beneath the barrel.
- The planter on top can be from any number of materials, whether it's a bowl, water garden element or a bit of pond liner stapled into place or held with construction adhesive. Don't forget potting soil and bedding plants.
- A spade bit, driver bit and drill to make a hole for the plumbing near the bottom of the barrel and to drive the screws to hold the boards in place. If you're using ceramic or vinyl planks, you'll want to remember an appropriate bit for the screw holes, and a masonry bit for the ceramic tile's plumbing connections at the bottom of the barrel.
- A circular saw and saber or jigsaw, or a tile saw for ceramic wood planks.
- A plumber's wrench.
Preparing the Planks

Start by determining how tall your barrel planks will need to be. In my case, I used a water garden insert on top of the barrel, so I needed the planks to be tall enough to reach the top of the insert's lip.

After measuring, cut the planks to length. If you're careful and match up your edges, you can cut multiple planks at a time.

Once your planks are cut, pay attention to how you place them along the barrel. Solid wood tends to cup, and for this project, we're going to take advantage of that natural curve. If I lay out the first plank with the cup edges out, it creates harsher edges.

If I turn the plank around, the curve is closer to that of the planter and barrel, making a much better fit.
At this point, you can lay all your planks around the barrel.
Fastening the Planks

To fasten the planks to the barrel, pass a bit of rope around the barrel and tighten it to help keep everything in place. If you're using vinyl or ceramic planks, you'll want to pre-drill the holes for the screws. Avoid driving the screws too far through the barrel itself. Measure down until you're just past the lip of the barrel, then set a screw into the plank. Because the screws will tend to push the plank away from the barrel at first instead of digging in, start by setting the screws into all the planks, then go back around again to tighten the screws into the barrel itself.

Wrap the rope around the barrel. I used 50' of rope between the upper and lower bands, using a couple of inches of duct tape to stabilize the ends. Create a loop that sticks down below where you'll be wrapping, with the end of the rope sticking out of the top. Wrap around the barrel several times, until the rope gets too short to complete another round. Tuck the end of the rope through the loop like this:

Then pull the upper end to draw the lower end behind the rope:

And tuck the ends in:
Plumbing the Barrel

Now you'll create an access for the rainwater from your gutter to enter the barrel, an overflow if necessary, and a place to flow out through a valve near the bottom. Start by cutting one of the boards shorter--this may require a little playing to find the right depth for your barrel, lid and gutter system.


Try the lid on to make sure you get a good fit:

Once you've got a good fit on the top, make sure your drill bit will fit the plumbing nipple that will pass through the barrel and wood to connect the inside of your barrel to the outside of the barrel. In this case, I used a 1-1/8" spade bit with a 3/4" nipple.

Now measure down the outside of the barrel to that point and make sure your entire drill bit will fall above that measurement and start drilling your hole.

Note: UsingVinylorCeramicplanks?
If you're usingceramic planks, make sure to keep spraying a bit of water or oil on the hole to keep the bit from overheating. If you're usingvinyl planks, take it slow to prevent tear-out.
Once you're done with the hole, take the plumbing nipple and wrap it with Teflon tape. This helps keep it from rusting on the outside and provides a tighter seal with the threads on the coupler and the hose bib.

After the hole is completed, wrap the plumbing nipple with Teflon tape to prevent corrosion and get a tighter seal with the threaded connections.
Attach the plumbing nipple to the hose bib and insert it through the hole in the board and barrel. Once it's in place and relatively level, use a couple of screws to hold the hose bib in place and prevent it from rotating, remembering to pre-drill the holes if you're usingvinylorceramicplanks.
Add a bead of waterproof silicone caulk to one side of the coupler.

Connect the coupler to the end of the plumbing nipple that is sticking through the barrel, tighten it with a wrench, and add another layer of caulking to the connection. Smooth the caulk around the connection with your finger, which will push the caulking further into the joint creating a better seal. Don't forget to caulk over the ends of the screws that have passed through the barrel!Screw the coupler onto the end of the steel nipple that is on the inside of the barrel, then tighten it using a wrench and add one more layer of caulking to the connection. Use your finger to smooth the silicone caulk around the connection to push the caulking further into the joint. This creates a better seal. Caulk over the ends of the screws that have passed into the inside of the barrel.
Plants for Beautification

Now you can place the barrel on top of any risers you want, put the lid back on with the connection for your gutter system, then place the planter on top and add potting soil to the planter.
Add your bedding plants, attach a hose and you're ready to go! The wood boards will naturally weather to a softer gray, or you can stain and seal them to preserve the boards' natural beauty, while vinyl or ceramic planks will retain their appearance without much maintenance. This DIY home improvement project takes just a few short hours on a pleasant afternoon and will deliver years of reliable service.
About the Author
Cathleen V. is a dedicated DIYer, writer and artist living with her family on their sheep farm in southwest Missouri. With over 26 years of experience in contracting and advanced DIY, she loves helping people find their inner artist and style. She's an active member of the local arts scene creating beautiful glass and fiber artwork, and also volunteers in a range of emergency response roles in the community.
The articles and other content contained on this website/blog are provided for informational purposes only and should not be relied upon for any purposes. While it is our goal to provide you with up-to-date, relevant and useful information on a wide range of topics, we make no representations or warranties of any kind, whether express or implied, concerning the reliability, suitability, completeness or accuracy of any of the information made available on this site. The articles and information contained on this site are not intended to provide legal, accounting or other professional or business advice and should not be treated as a substitute for the advice of a professional with knowledge of the facts and circumstances of your specific situation. By accessing this site, you agree that you will not seek to hold E.C. Barton & Company or any of its affiliates liable for any losses or unanticipated costs or assert any other claim based on your use of this site or on the reliance on the content contained herein.